Your iPhone passcode is a valuable key that unlocks your smartphone’s secrets. However, there may come a time when you feel the need to change it – whether it’s because your current passcode feels too predictable or simply because you want something fresh. Well, fret not! We are about to embark on an exciting journey to help you modify that passcode of yours. Consider this guide as cozy as curling up on a couch, with some special words sprinkled in to make the experience unforgettable. Get ready for some passcode magic!
When Should You Change Your Passcodes?
Before we get into the step-by-step process, let’s take a moment to consider why you might want to change your iPhone passcode. There are actually a few reasons why this could be beneficial. Firstly, you may have concerns about someone potentially figuring out your current passcode, and it’s always good to prioritize security. Additionally, changing your passcode can be a way of keeping things new and exciting in the digital realm. It’s similar to redecorating your home – refreshing and freeing in its own way. So, let’s jump right into how you can make this change!
How to Changing Passcode on iPhone
Step 1: Go to “Settings” App
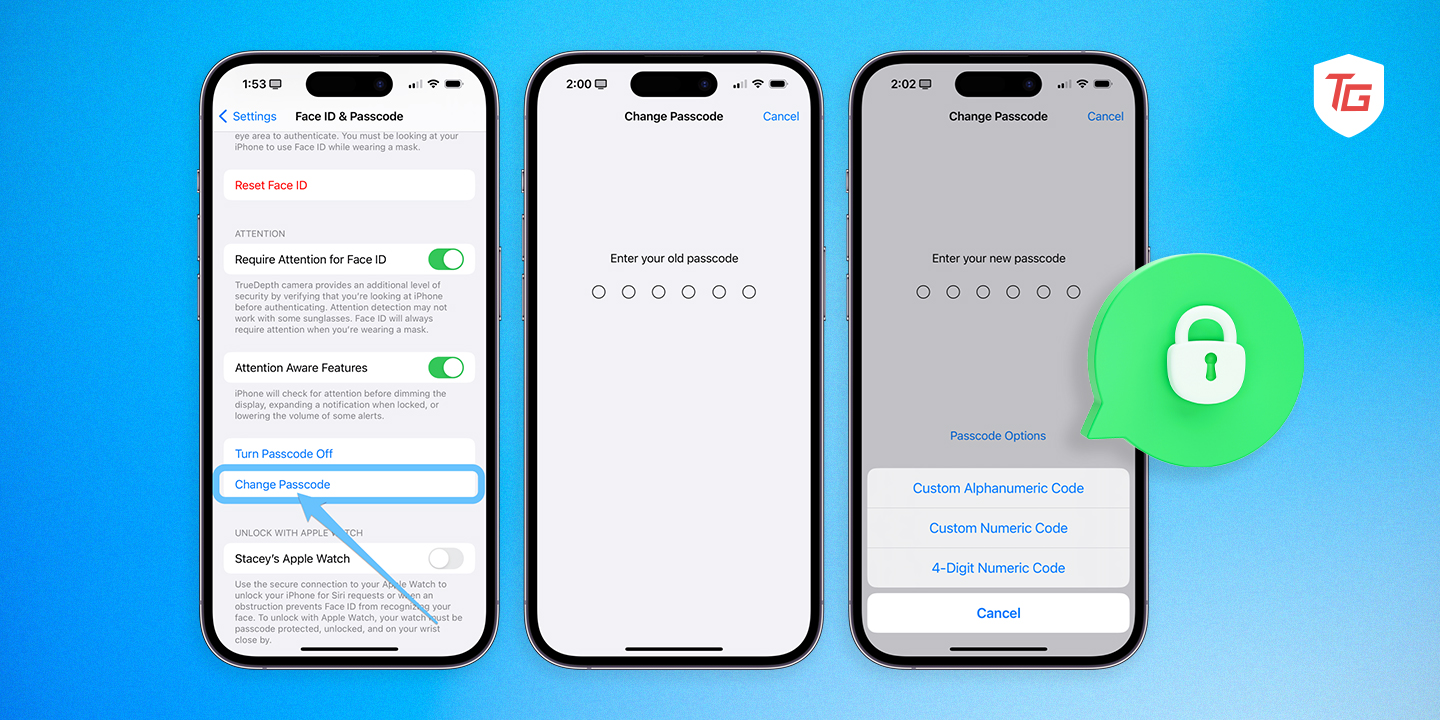
Step 2: Scroll Down to “Face ID & Passcode” or “Touch ID & Passcode”
Step 3: Enter Your Current Passcode and then Tap “Change Passcode”
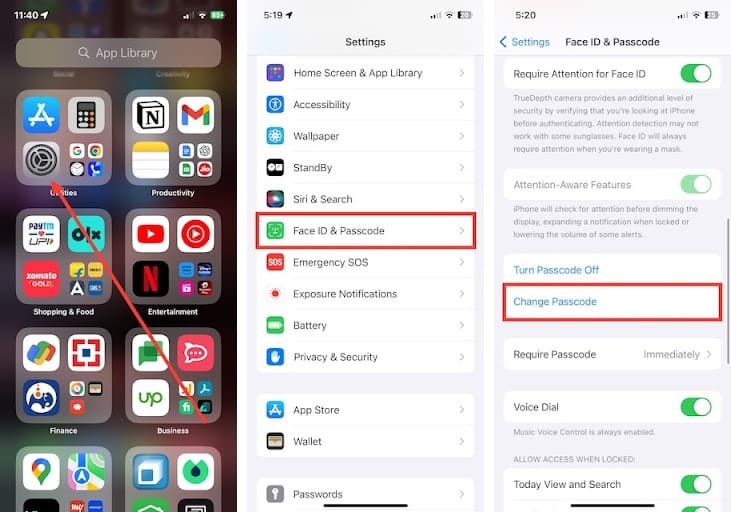
Step 4: Enter Your Current Passcode Again
To prove you’re not an impostor, your iPhone will ask for your current passcode one more time. Enter it with confidence.
Step 5: Set Your New Passcode
Now, it’s time for the fun part – setting your new passcode! You can use a combination of numbers, letters, or even special characters. Make it as unique as a fingerprint, but don’t forget it!
Step 6: Confirm Your New Passcode
After you’ve crafted your new passcode masterpiece, you’ll need to enter it once more to make sure you got it right.
Step 7: Done and Dusted.
Congratulations! You’ve successfully changed your iPhone passcode. Your digital world is now secured with a fresh and fancy code.
Tips to Make iPhone Safe and Secure
- Use a Strong Passcode: When setting your passcode, choose a combination of numbers, letters, and special characters. Avoid common sequences like “1234” or “password.”
- Enable Two-Factor Authentication (2FA): Turn on 2FA for your Apple ID. This adds an extra layer of security by requiring a code sent to your trusted device when signing in on a new device.
- Update Regularly: Keep your iPhone’s software up to date. Updates often include security patches that protect against the latest threats.
- Use Touch ID or Face ID: If your iPhone supports it, enable Touch ID or Face ID for faster and more secure access. These biometric authentication methods are more secure than just a passcode.
- Auto-Lock: Set your iPhone to auto-lock after a short period of inactivity. This ensures that if you leave your device unattended, it’s not easily accessible.
- Find My iPhone: Activate “Find My iPhone” in your iCloud settings. This feature allows you to track your device if it’s lost or stolen, and even remotely wipe it if necessary.
- App Permissions: Regularly review the permissions granted to apps on your device. Only allow apps to access the information they need to function.
- Secure Your iCloud: Use a strong password for your iCloud account and enable 2FA. Your iCloud account holds important data, including backups.
- Regular Backups: Back up your iPhone to iCloud or your computer to ensure you can recover your data in case of loss or theft.
- App Store Downloads: Only download apps from the official App Store. Sideloading apps from unofficial sources can pose security risks.
Conclusion:
Changing your iPhone passcode is like giving your device a new lease on life. It’s a small step that can make your digital experience feel a bit more personalized and secure. So, go ahead, change your passcode, and enjoy the feeling of digital renewal. Your iPhone is now ready to embrace its new secret handshake with you!
Also Read:

